Getting a ChatGPT powered, Python API, production ready
2023-06-02
In the last post we created a simple app powered by ChatGPT.
Now we will look at ways to productionise the application.
Getting an application working and deploying it from your machine is a good start. You will quickly hit limitations working this way. We will set things up so that whatever is on the main branch on GitHub deploys to production.
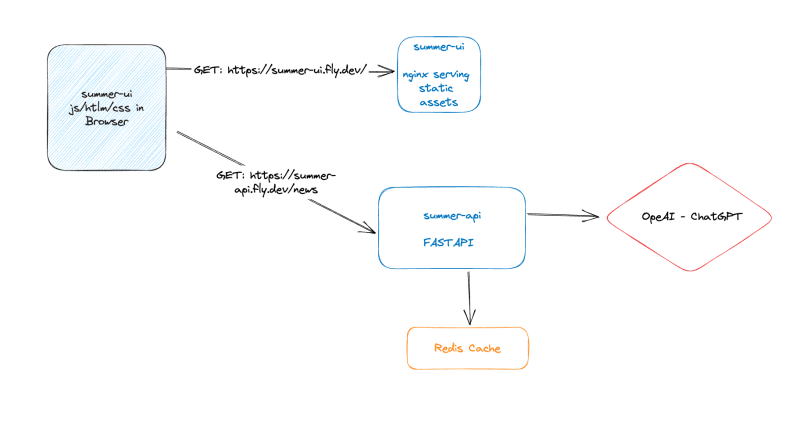
Another issue we have is we depend on the ChatGPT API, and it is slow! We will introduce another component to our system to cache ChatGPT responses. Our system will look like this.
Getting your idea deployed and usable is only the beginning. We need tools and techniques to observe and operate our application in production. We also need ways to keep our code quality high so we're confident in deploying often.
We usually automate tests early and design our system to be easy to test with fast feedback. It's a big topic, though. Testing prompt-based applications is interesting. There's also a lot to observability. We'll save looking at those for the next post in this series.
Deployment Pipeline
One of the first things I do when starting a new project is set up a deployment pipeline. It's never been easier to set one up, and it's something that only gets harder the longer you wait.
Deploying to production early and often is so important. You may not need convincing, but if you would like more context on why, check out this great post: HOW MUCH IS YOUR FEAR OF CONTINUOUS DEPLOYMENT COSTING YOU? Also consider reading more of Charity Majors' blog. Another excellent resource is Modern Software Engineering by Dave Farley.
We can use GitHub actions for our pipeline. This is free for public repositories. We will be following the recommendations from the fly.io docs.
The steps will be the same for both the UI and the backend. We're only setting up continuous deployment in this part. We'll update the pipeline to run some tests in the next post.
Do these steps in both the UI and API. You must have followed the steps in part 1 for deploying with fly.io.
cdinto the repository and runfly tokens create deploy.- Copy the output.
- Go to the repository settings in GitHub and select 'Secrets and variable' -> 'Actions'.

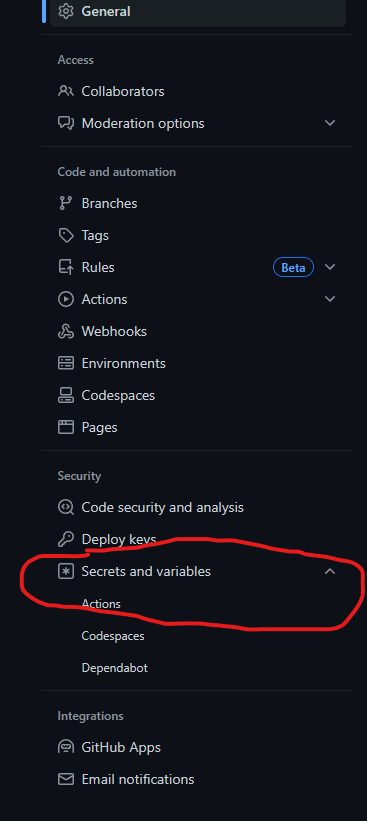
- Click the button 'New repository secret'
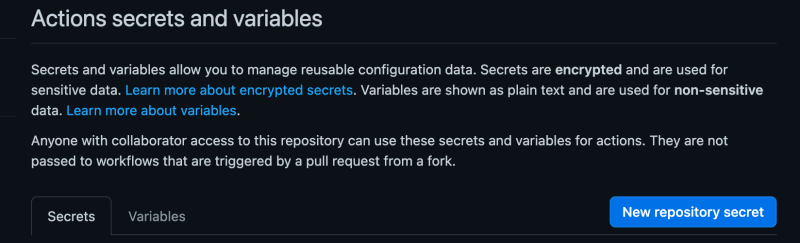
- Call the secret
FLY_API_TOKENand paste the token you got from runningfly tokens create deploy, into the Secret input.
- Back in the repository on your local machine, create a workflow file:
mkdir -p .github/workflows/ && touch .github/workflows/fly.yml.

- Put the following content in the
.github/workflows/fly.ymlfile.
name: Fly Deploy
on:
  push:
    branches:
      - main
jobs:
  deploy:
    name: Deploy app
    runs-on: ubuntu-latest
    steps:
      - uses: actions/checkout@v3
      - uses: superfly/flyctl-actions/setup-flyctl@master
      - run: flyctl deploy --remote-only
        env:
          FLY_API_TOKEN: ${{ secrets.FLY_API_TOKEN }}
This workflow does the same thing we've been doing from our local machine with the flyctl CLI. It's using the token we configured as opposed to how we did fly auth login locally, but otherwise, it's the same.
Push the changes up git add . && git commit -m 'Add deployment workflow' && git push.
Give it a few minutes and you should hopefully see the pipeline run.
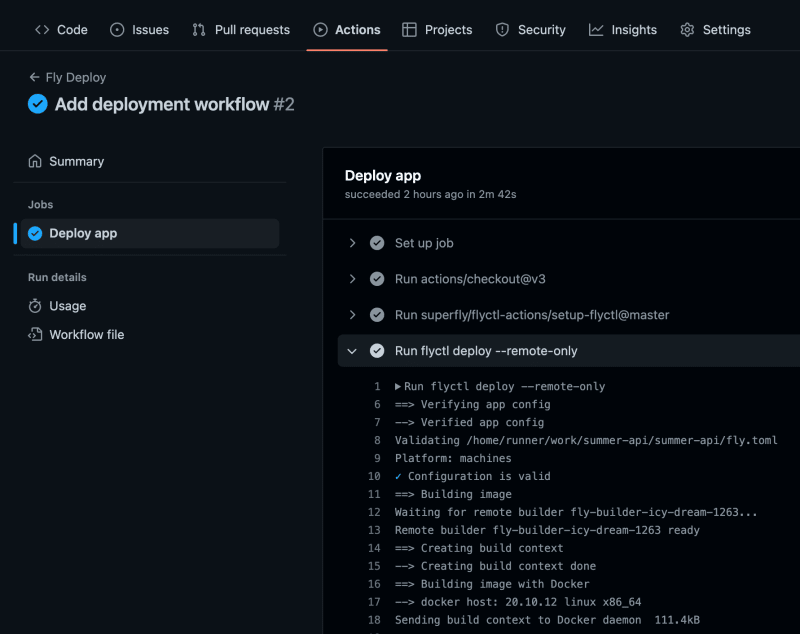
Now every time a push to main occurs, the latest code will deploy.
Caching ChatGPT Responses
If you have followed along, creating the app step by step, you may have noticed the API is very slow.
ChatGPT takes a long time to respond. There are many ways to go about optimising and tweaking performance. In a lot of cases though, a simple cache will work.
You may have heard the "two hard things" saying:
There are only two hard things in Computer Science: cache invalidation and naming things.
-- Phil Karlton
Caching can be challenging, but most of the internet uses it. If you keep it very simple, caching is a powerful tool. I've rarely had a real-world use case of an application which had to do time-consuming computation or work across network boundaries where I didn't use caching and where it didn't help.
Often an in-memory cache is enough to start with. We can't do that running in fly.io as our application gets shut down when not in use. Luckily we can spin up a free Redis instance. We will go through that now.
Fly.io provides Redis using Upstash.
cd into your local API repository.
Create a Redis instance:
flyctl redis create
After creation, you should be presented with a connection URL which you must copy. If you need to look it up again you can run the following:
flyctl redis list
You should see your instance and an ID for it. Copy the ID and run:
fly redis status <the ID you copied>
You will see some output, similar to the following, which includes a 'Private URL'.
Redis
  ID             = aaV829vaMVDGbi5
  Name           = late-waterfall-1133
  Plan           = Free
  Primary Region = mad
  Read Regions   = ams
  Private URL     = redis://password@fly-magical-javelin-30042.upstash.io
In that example you would copy redis://password@fly-magical-javelin-30042.upstash.io
We need to store the connection URL as a secret in our application.
flyctl secrets set REDIS_URL="the URL you copied"
Demonstrating using the previous example:
flyctl secrets set REDIS_URL="redis://password@fly-magical-javelin-30042.upstash.io"
Now we need to update our API to use Redis for caching.
We will use a handy Python package called fastapi-cache2.
poetry add fastapi-cache2
Back in our app/main.py file we need to import some cache modules.
from fastapi_cache import FastAPICache
from fastapi_cache.backends.redis import RedisBackend
from fastapi_cache.decorator import cache
We're using FastAPICache to initialize the cache. We're going to configure a Redis backend (we could but won't use in-memory or some other storage backend instead).
The cache decorator adds an annotation we can add to any function. The decorator caches the output of that function, keyed to the inputs.
When introducing a new component like this, we face choices and tradeoffs again. If our app depends on Redis, should anyone who wants to run it now have Redis running locally? Should we make the application behave differently when running locally and only connect to Redis in production?
The choice is yours, but I'll give my recommendation. When running locally, I try to be as like production as possible. Docker Compose is suitable for this.
Add a docker-compose.yml file.
touch docker-compose.yml
Add the following content to that file:
services:
  app:
    build:
      context: ./
      dockerfile: ./Dockerfile
    depends_on:
      - redis
    environment:
      - OPENAI_API_KEY=${OPENAI_API_KEY:-UNDEFINED}
      - NYTIMES_API_KEY=${NYTIMES_API_KEY:-UNDEFINED}
    volumes:
      - ./:/usr/app
      - /usr/app/.venv/ # This stops local .venv getting mounted
    ports:
      - "8080:8080"
    command: ["uvicorn", "app.main:app", "--host", "0.0.0.0", "--port", "8080", "--reload"]

  redis:
    image: redis
    ports:
      - '6379:6379'
    volumes:
      - redis:/data

volumes:
  redis:
    driver: local
This sets up a Redis instance we can now connect to. Your application running in its container will see the redis server on its network with a hostmane of redis.
Add a startup hook to app/main.py:
@app.on_event("startup")
async def startup():
    REDIS_URL = os.getenv("REDIS_URL", "redis://redis")
    redis = aioredis.from_url(REDIS_URL)
    FastAPICache.init(RedisBackend(redis), prefix="fastapi-cache")
We can now cache our API call with the following annotation:
@cache(namespace="test", expire=21600)
namespace can be any string to namespace these cache entries.
expire is how long in seconds we want to cache this entry for. 21600 is 6 hours.
The full main file:
import os

from fastapi import FastAPI, HTTPException
from fastapi.middleware.cors import CORSMiddleware
from fastapi_cache import FastAPICache
from fastapi_cache.backends.redis import RedisBackend
from fastapi_cache.decorator import cache
from redis import asyncio as aioredis

from .nytimes_client import get_top_stories
from .story_formatter import format_stories_to_string
from .summariser import summarise_news_stories

app = FastAPI()

origins = [
    "http://localhost:8080",
    "http://127.0.0.1:5500/",  # Live server default
    "https://summer-ui.fly.dev/",
]

app.add_middleware(
    CORSMiddleware,
    allow_origins=[origins],
    allow_credentials=True,
    allow_methods=["*"],
    allow_headers=["*"],
)


@app.get("/")
def index():
    return {"msg": "Welcome to the News App"}


@app.get("/news")
@cache(namespace="test", expire=21600)
def news():
    summary = ""
    images = []
    try:
        stories = get_top_stories()
        for story in stories:
            images.extend(story["multimedia"])
        summary = summarise_news_stories(format_stories_to_string(stories))
        print(summary)
        images = list(
            filter(lambda image: image["format"] == "Large Thumbnail", images)
        )
    except Exception as e:
        print(e)
        raise HTTPException(
            status_code=500, detail="Apologies, something bad happened :("
        )
    return {"summary": summary, "images": images}


@app.on_event("startup")
async def startup():
    REDIS_URL = os.getenv("REDIS_URL", "redis://redis")
    redis = aioredis.from_url(REDIS_URL)
    FastAPICache.init(RedisBackend(redis), prefix="fastapi-cache")
Now run:
docker compose up
You should be able to load the application on http://localhost:8080/news.
We exposed the redis server on port 6379 which means you can connect to it on localhost:6379.
I used a VSCode database plugin:

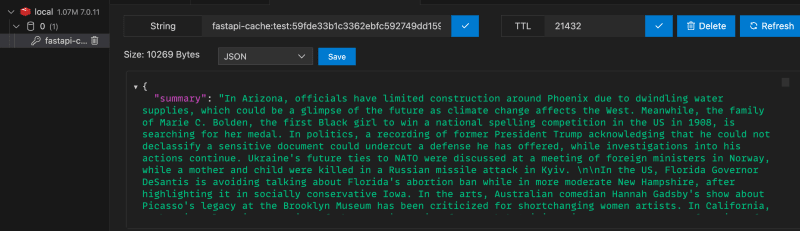
With this cache setup, our API will only hit the ChatGPT API, at most, once every 6 hours. The site will be faster, and we'll spend less money on ChatGPT calls.
You might be thinking, what about the unfortunate user who opens the app after the cache expires? There are many options for improving performance here. We could, for example, run a scheduled job that refreshes the cache for us. If you find this problem interesting and want to learn some techniques, check out the book Designing Data-Intensive Applications.
Conclusion
Now our application is automatically deploying. We've also improved performance and reduced costs using caching.
How do we know what happens in our application after it's deployed? How do we test it? We'll cover all that in the next post coming soon.
Thank you for reading!